Break-Away Assembly Tutorial
Summary
- Make sure you have all the components
- Slide the Belt Loop onto a waist belt that came with your Power Tower/Rack (or use our Swimming Power Harnesses instead)
- Connect each end of the Anchor Rope to the diving block and the Pull cord on the Panic Snap
- Connect the Power Tower to the Break-Away rope at the Bull Snap end
- Connect the Panic Snap end of the Break-Away rope to the Belt loop or Harness carabiner
- Swim and Break Away!
Detailed Instructions
The end goal is to make all these connections in the picture below. Step by step instructions and tips below.

Step 1- Make sure you have all the components
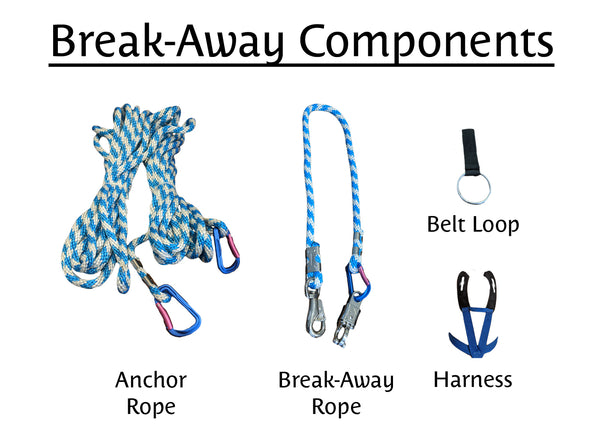
- Anchor Rope with a carabiner on both ends
- Break-Away Rope with a Bull Snap on one end and a Panic Snap with the Pull Cord on the other end
- Belt Loop
- Harness

Step 1.5- Understand how the Break-Away Rope works (it's the magic ingredient!)
Each end of the Break-Away Rope has a specialized carabiner. The Bull Snap end is basically a typical carabiner, just a lot heavier which is necessary to keep the Tower from returning the Break-Away at unsafe speeds.

The Panic Snap works by a sleeve mechanism that holds the device closed until the sleeve is pulled back which opens the Panic Snap and releases the swimmer. This opening mechanism is achieved by the orange Pull Cord.

Step 2- Modify your Waist belts that came with your Power Tower (skip if you are using the Harness)
Be aware that the Break-Away system requires that each swimmer have their own belt or Harness in order to improve efficiency. We like to use a combination of belts and Harnesses depending on the swimmer, stroke and time of season.

Step 3- Anchor one end of the Anchor Rope into a diving block, lane line holder or other on-deck object. Even a swim partner can act as an anchor!
Depending on how much you wrap the Anchor Rope, you can adjust where the release point is up to 15 yards down the lane (including the swimmer's height).
DO NOT ANCHOR INTO THE POWER TOWER! Do not use with bungee cords either. In case the Break-Away did not release, the Power Tower won't fall into the pool.

Step 4- Connect the free end of the Anchor Rope to the orange Pull Cord on the Panic Snap
When the Anchor Rope reaches its full length as the swimmer goes down the pool length, it will pull on the Pull Cord and open the Panic Snap, releasing the swimmer.

Step 5- Connect the Break-Away rope to the Belt Loop or Harness via the Panic Snap

Step 6- Connect the free end of the Break-Away rope to the Power Tower connector via the Bull Snap

Step 7- Test your Break-Away before every use. Otherwise, you are ready to go!


